Wow! It has been awhile since I posted. It has been crazy and fun since the boys have been out of school, which leaves little time for posting. Sooooo, today I decided to share a couple quick travel tips that are so handy when travelling with kids. These are not my ideas, but they are ones that I have tried and liked.
First, I found this great idea for packing clothes in Ziploc bags a couple of years ago. Basically you put one outfit in each bag and it helps keep things in order and also protects clean clothes from dirty clothes, if you have to throw them all back in the suitcase and change locations.
I have also used this method for my boys while they have stayed with cousins or grandparents. I labeled the bags with the day they were to wear them. That way, I knew that the boys would end up wearing the proper clothes to school and the play clothes on Saturday.
I have loved this method. When we unpack after we return home, we keep the Ziploc bags inside the luggage to be used on the next trip.
Second, I found this idea for travel snack boxes on Pinterest last summer. I was a little skeptical at first. I was sure my kids would totally overindulge, eat all their snacks right away, and be sick. Luckily, they did great and made those snacks last for the entire trip (both going and coming, over 8 hours each way)
I cut little vinyl labels for each of their snack boxes. The boys love them and it helps them actually look forward to that long car trip each summer.
Showing posts with label travel tips and ideas. Show all posts
Showing posts with label travel tips and ideas. Show all posts
Monday, June 17, 2013
Monday, April 8, 2013
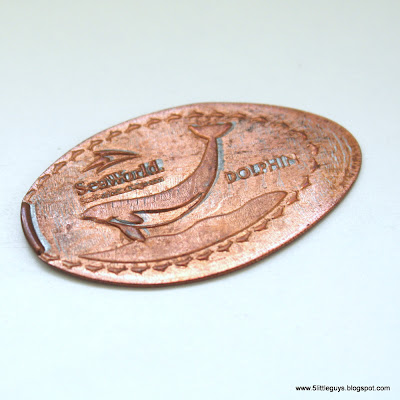
Pressed Pennies and Penny Passports
A couple of years ago we started pressing pennies for the boys at the gift shops that had machines whenever we took a trip. I then found some little penny passports on ebay and bought one for each of them. Now whenever we run onto a machine, the boys love to pick their design, insert their penny and money (usually two quarters) and watch their penny get pressed. Then we put them in the passport booklet for safe and easy storage and my boys can look at them whenever they like.
You can find a list of machine locations at pennycollector.com here. So, whenever you are planning a trip, you can look up machine locations and be ready with shiny pennies and enough quarters to press the amount you need.
My boys love their little penny passports and all the memories inside. My 5 year old even decided to take his passport for his only show and tell day at preschool and all the kids thought it was pretty cool.
This has been a great clutter-free souvenir solution for our family.
Thursday, March 28, 2013
Trading Card / Playing Card Storage
I don't know how it is where you are, but around here, young elementary school boys must have Pokemon cards. They are a pretty big deal to a few of my boys right now, and it seems that they always want to take a big handful whenever they are getting together with cousins or friends. After losing several and sending a bunch (left in pockets) through the wash, I decided we had to come up with a better way to store these trading cards while on the go.
Here is my solution. . .
This box could be used to store playing cards or other types of trading cards as well. Pretty handy for just a dollar, and you get to beef up your first aid supplies too. Not bad.
Thursday, February 21, 2013
Magnetic Puzzles
Recently, I decided to make some of the magnetic puzzles I found on Pinterest that are blogged about here. I found some cute little wood puzzles at Dollar Tree that had some of my boys favorite characters on them. When I looked at my roll of magnetic tape, it seemed a little thick and I was afraid that it might make the puzzle pieces rock a little when the puzzle was being put together, so, for the first puzzle I decided to use a thin magnet sheet I found at the dollar store awhile ago. I cut the sheet up into pieces that would fit on the backs of the puzzle pieces. Then my boys put the puzzle together on a cookie sheet. They had fun. After all, it was playing with magnets and putting a puzzle together at the same time. (Double fun!) While this worked well, and I think the magnets were strong enough to work well for a car trip, they definitely weren't strong enough for trying to put the magnets together on a vertical surface. For the second puzzle, I used my magnet tape. The pieces did rock a bit as expected, but they definitely adhered to the metal surface better. In fact, they adhered so well, that some of them stuck to the surface rather than the puzzle piece when taking them off. So, they will probably need a little dab of glue under each of the magnet pieces, rather than just relying on the adhesive that comes on the magnet tape.
Overall, this was worth it. It made putting puzzles together a little extra fun for the kids and I look forward to trying them out on our next road trip. And, in case you're interested, for my third puzzle, I am probably going to use the magnet tape with a little extra glue.
Subscribe to:
Posts (Atom)


