Thursday, February 28, 2013

Unusual Holidays List 2013

 
If you are like me, you are always looking for some fun things to do with your kids.  I have compiled a list of some unique and fun, lesser known, holidays that might provide a little inspiration. 
 
This list is mostly made up of special days recognized in the United States and is not all inclusive.  The days are correct, to the best of my knowledge, but there may be a few errors.  I have included all the special days I could find between March 1, 2013 and December 31, 2013.
 
Warning:  This is a long list.  The following links are to PDF files, you will need a reader installed on your computer to pull them up.
 
 
To view or print the list for a specific month, please click on the month below:
 

Wednesday, February 27, 2013

Birdseed Ornaments


Is Winter still in full swing where you live?  It certainly is here and we can't wait for warmer weather, but until then, why not add a little fun to your barren trees with some birdseed ornaments.  My boys and I had a fun time making these and then hanging them on the trees (in the bitter cold) the next day. 

The recipe we used is the following:

Birdseed Ornaments

3/4 cup flour     
1/2 cup water
1 envelope unflavored gelatin
3 tbsp. corn syrup
4 cups birdseed
molds (muffin tin, cookie cutters, etc.)
nonstick spray
drinking straw
waxed paper
ribbon/twine

Method: 
Combine the flour, water, gelatin, and corn syrup in  large bowl, then add the birdseed and mix until well coated.  Spray the molds with nonstick spray and lay them on a waxed paper lined cookie sheet.  Fill the molds  with the birdseed.  Pack it down and level it out as best you can.  Poke a hole in each ornament with a drinking straw.  Allow to dry for 2 to 3 hours.  Carefully unmold the ornaments and lay them down, upside down, on a fresh piece of waxed paper.  Allow to dry overnight.  The next day, thread your ribbon, twine, or string through the hole and tie it off. Then enjoy hanging them on your trees outside and watching the little birds that visit.


Monday, February 25, 2013

Alphabet Memory


My little boys and I have been playing alphabet memory.  I love this game.  It is always a bonus when the kids can have fun playing and still be learning at the same time.


Thursday, February 21, 2013

Magnetic Puzzles


Recently, I decided to make some of the magnetic puzzles I found on Pinterest that are blogged about here.   I found some cute little wood puzzles at Dollar Tree that had some of my boys favorite characters on them.  When I looked at my roll of magnetic tape, it seemed a little thick and I was afraid that it might make the puzzle pieces rock a little when the puzzle was being put together, so, for the first puzzle I decided to use a thin magnet sheet I found at the dollar store awhile ago. I cut the sheet up into pieces that would fit on the backs of the puzzle pieces.  Then my boys put the puzzle together on a cookie sheet.  They had fun.  After all, it was playing with magnets and putting a puzzle together at the same time. (Double fun!)  While this worked well, and I think the magnets were strong enough to work well for a car trip, they definitely weren't strong enough for trying to put the magnets together on a vertical surface.  For the second puzzle, I used my magnet tape.  The pieces did rock a bit as expected, but they definitely adhered to the metal surface better.  In fact, they adhered so well, that some of them stuck to the surface rather than the puzzle piece when taking them off.  So, they will probably need a little dab of glue under each of the magnet pieces, rather than just relying on the adhesive that comes on the magnet tape.


Overall, this was worth it.  It made putting puzzles together a little extra fun for the kids and I look forward to trying them out on our next road trip.  And, in case you're interested, for my third puzzle, I am probably going to use the magnet tape with a little extra glue.

Wednesday, February 20, 2013

Cooked Play Dough


Several years ago, I outlawed play dough at our house.  I found hot pink play dough ground into my new carpet and after working, and working, and working to get it out, I finally decreed that play dough's days were done for us.  After several months, I finally gave in and let my boys start playing with it again, but only under supervision.  So, playing with play dough is still kind of a special occassion at our house because I only allow it when I can keep tabs on what is going on.

Our favorite play dough is this cooked variety.  As a kid, I always hated the feeling of salt dough on my hands, but this play dough has a nice, smooth texture and it keeps well for a couple of months if stored correctly.  We love it!

You can find the full recipe and a tutorial on how to make this play dough at my other blog here.  I highly recommend it.  We have been enjoying it for years!


Monday, February 18, 2013

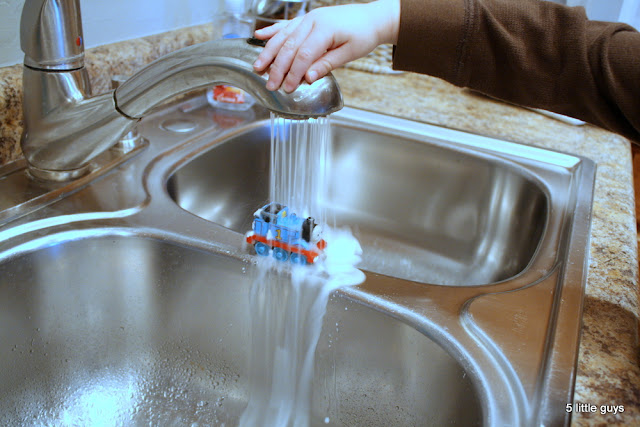
Thomas and Percy at the Washdown


If you have a little boy who is seriously into Thomas the Tank Engine, then chances are he is going love this simple little activity.  My three-year old is in a major train-loving phase and when I showed him how to do this, he could not get enough.  It kept him occupied for a long time.

Items needed:

  • Thomas the Train or one of his friends (one that can get wet)
  • Shaving Cream (we just bought a cheap $1 can at Dollar Tree)
  • sink or tub
  • faucet

1.  Put Thomas in the sink, or on the divider between the two sinks.


2.  Cover Thomas in shaving cream.


3.  Turn on the water and watch Thomas get "washed down."


Percy got a wash down too.


Super Fun!!!

Linking up with:

Thursday, February 14, 2013

No Mess Marbled Painting


Once in a while, I will try an activity I find on Pinterest or elsewhere in the blogosphere, and put in my two cents about it here.  Today we tried no mess marbled painting that is blogged about on Inner Child Fun here.

This was a simple little project that required minimal supplies, prep, and clean-up. 

Basically, you add equal parts baby oil and water-based paint to a heavy duty ziploc bag.  Carefully press out as much air as you can and seal tightly.  Then let the kids swirl the paint away to their hearts content.

This is how it went over here - - my three year old would not even try it.  My baby that is a year and half thought it was great for about 10 minutes and then lost interest.  I found that I did not add enough of the second color and the two colors did start to blend after repeated swirling and squishing and they did not create a very pretty color, so you might think about that when choosing your colors.


Overall, I would do this again.  It is easy and inexpensive enough and I actually think my older boys might enjoy giving it a try.  So head on over to Inner Child Fun and check out her fun tutorial.  It is definitely worth a try.


Wednesday, February 13, 2013

Keepin' it Real

I had plans this year to make cute, candy-free, but still fun valentines for my boys' classmates, but they require a lot more time and money than something you can just pick up at the store.  Sadly - I ran low on both - so this is what we did yesterday after school.


I bought the little Rice Krispies Treats valentines and my boys' got them personalized and ready to go.  Two of my boys just wanted to put stickers on them that said "Happy Valentine's Day" with their name (super easy).  So, I printed labels for them and they were peeling and sticking away, but son #2 wanted to go the extra mile and write who the valentines were to and from.

Next year - hopefully I will do a little better, but the boys are still excited about their valentines, so that is what really matters.  Sometimes you just have to give yourself a break.


Monday, February 11, 2013

Rocking Chair Makeover

When I was a little girl, I had a little white rocking chair.  I have a lot of fond memories of rocking my dollies in it.  Shortly after I got married, my husband and I found the little white rocker in my mom's basement in pieces.  We picked all of the pieces up and took them back to our house, with plans to fix it up for our little girl someday.  Five boys later, we have given up on any little girls coming to live at our house, but I couldn't bear to let the little rocker sit in pieces in the garage any longer, so we recently fixed it up for our littlest boys

Now, some purists, may be apalled that I painted over this rocker, but let me tell you, the chair was in really sorry shape.  In fact, my husband told me many times that if it hadn't been sentimental to me, he would have thrown it in the trash.  He had to manufacture some new spindles, dowels, and supports for it and put it all back together, then it took a lot of cleaning and sanding, but we ended up with a cute little rocking chair that my little boys are really enjoying.

Here are a couple of pictures of the chair after my husband got it back into working order, but before the paint job.


A final look at how I remember this rocking chair.


And a final look at the manufacturers sticker.


A couple coats of aqua paint and this rocker is clean, cute, and boy (or girl) appropriate.


I love it!!

Monday, February 4, 2013

Top Two Star Wars Party Tips

A while back I threw a Star Wars Birthday Party for my 6 year old.  He and his friends had a ball.  This is a pretty popular theme for boys around this age and you can find tons of ideas on blogs and Pinterest.  I used a bunch of them, but I want to share the two greatest hits of the party.  If I was to throw this party again, these would be the absolute "must do's".


Light saber training. This was, by far, the biggest hit of the party.  We got a bubble machine and told the boys they had to pop all the bubbles with their light sabers before they hit the floor. They did this for a long time and kept saying over and over "This is awesome!!!!!!"  The light sabers were made from the ever popular pool noodles, cut in half, with a little silver duct tape and black electrical tape for handles.  I would definitely recommend something like this, or even softer, because each child is bound to get hit a time or two in the frenzy to pop all the bubbles.  We had a few perplexed faces after being smacked by their neighbors light saber, but no tears, and the boys all recovered quickly and got right back to it.


The Star Wars cupcakes. I found these Star Wars: The Clone Wars rings online to use as toppers. The boys loved them and were picking up all the extras to cover as many of their fingers as they could.

This is such a fun theme for boys and I must admit, I had a lot of fun with it too.

Hot Wheels Derby


Since I have five little boys - I also have a bucket full of little cars. One year, for Christmas we gave the boys this Hot Wheels downhill raceway. Shortly after Christmas, I taught the boys how to have a "Hot Wheels Derby" - similar to a pinewood derby. We lined up all the cars and the boys took turns choosing, then we raced them and used a single elimination system to come up with the fastest. The boys love this and beg me several times a week to help them with another derby.

Sometimes I wonder why I had all boys. I was a "girly girl" most of my life and was never that into sports, bugs, snakes, or digging in the dirt. So, most of the time, I am at somewhat of a loss as to what to do to keep the boys entertained. I think, this time at least, I finally got something right.

Related Posts Plugin for WordPress, Blogger...